Introduction
Designed for the enterprise, Silo’s implementation of SAML SSO allows for PIN-less access with federated authentication through your preferred Identity Provider (IdP).
All Silo authentication steps are seamless and transparent to the end-user when employing SAML SSO functionality.
Technical Details
Silo will work with any SAML 2.0 SSO implementation with a few exceptions.
SSO compatibility has been verified with the following IdPs:
- Azure Active Directory
- Duo
- F5 BIG-IP
- Microsoft AD FS
- Okta
- OneLogin
- PingIdentity
- SecureAuth
- GSuite
- Google SSO
System Requirements
A working, compatible SAML 2.0 IdP
- Silo Access Portal must be enabled.
- For Windows installs, the enabling of Integrated Windows Authentication (IWA) is optional.
- TLS 1.2 connection
NOTE: Effective March 30 2020, our products will only support TLS 1.2 connections, and will cease support for TLS 1.1. For the Installed Client, please ensure their version meets/exceeds the minimum required to support TLS 1.2, and that
any in-line network infrastructure that connects to our servers has been
configured to use TLS 1.2.
Configuration
If you are already familiar with providing Single-Sign-On (SSO) access to other services, then the configuration should be straightforward.
We recommend reviewing your SAML IdP's documentation on Service Provider (SP) configuration prior to starting as a first step. This step should include locating your IdP's configuration URL values and X.509 (.crt) IdP Signing Certificate to help streamline the process.
Silo Portal Configuration
The Silo Portal configuration step consists of setting the Silo Access Portal (Vanity) URL; the Vanity URL must be set with in order for the SAML SSO configuration to work.
This will serve as a custom URL for SSO access to Silo
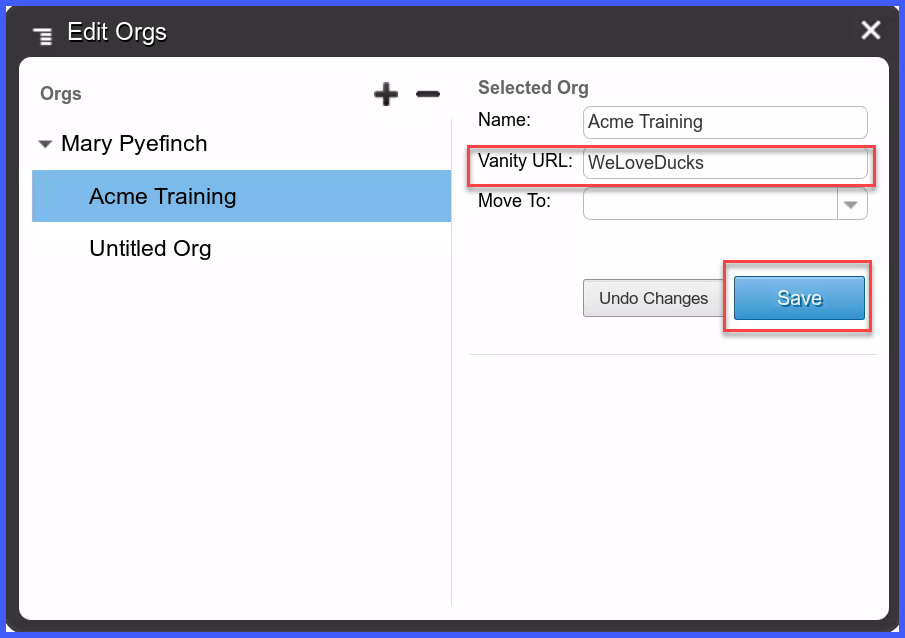
Steps
From the Silo Admin Console, navigate to Users and Orgs section:
A. Click the Manage button
B. Select your ORG and click the Edit Orgs button
C. Enter a value in the Vanity URL field
D. Click Save
Silo Single Sign-On Configuration
A. From the Silo Admin Console navigate to the Single Sign-On configuration page.
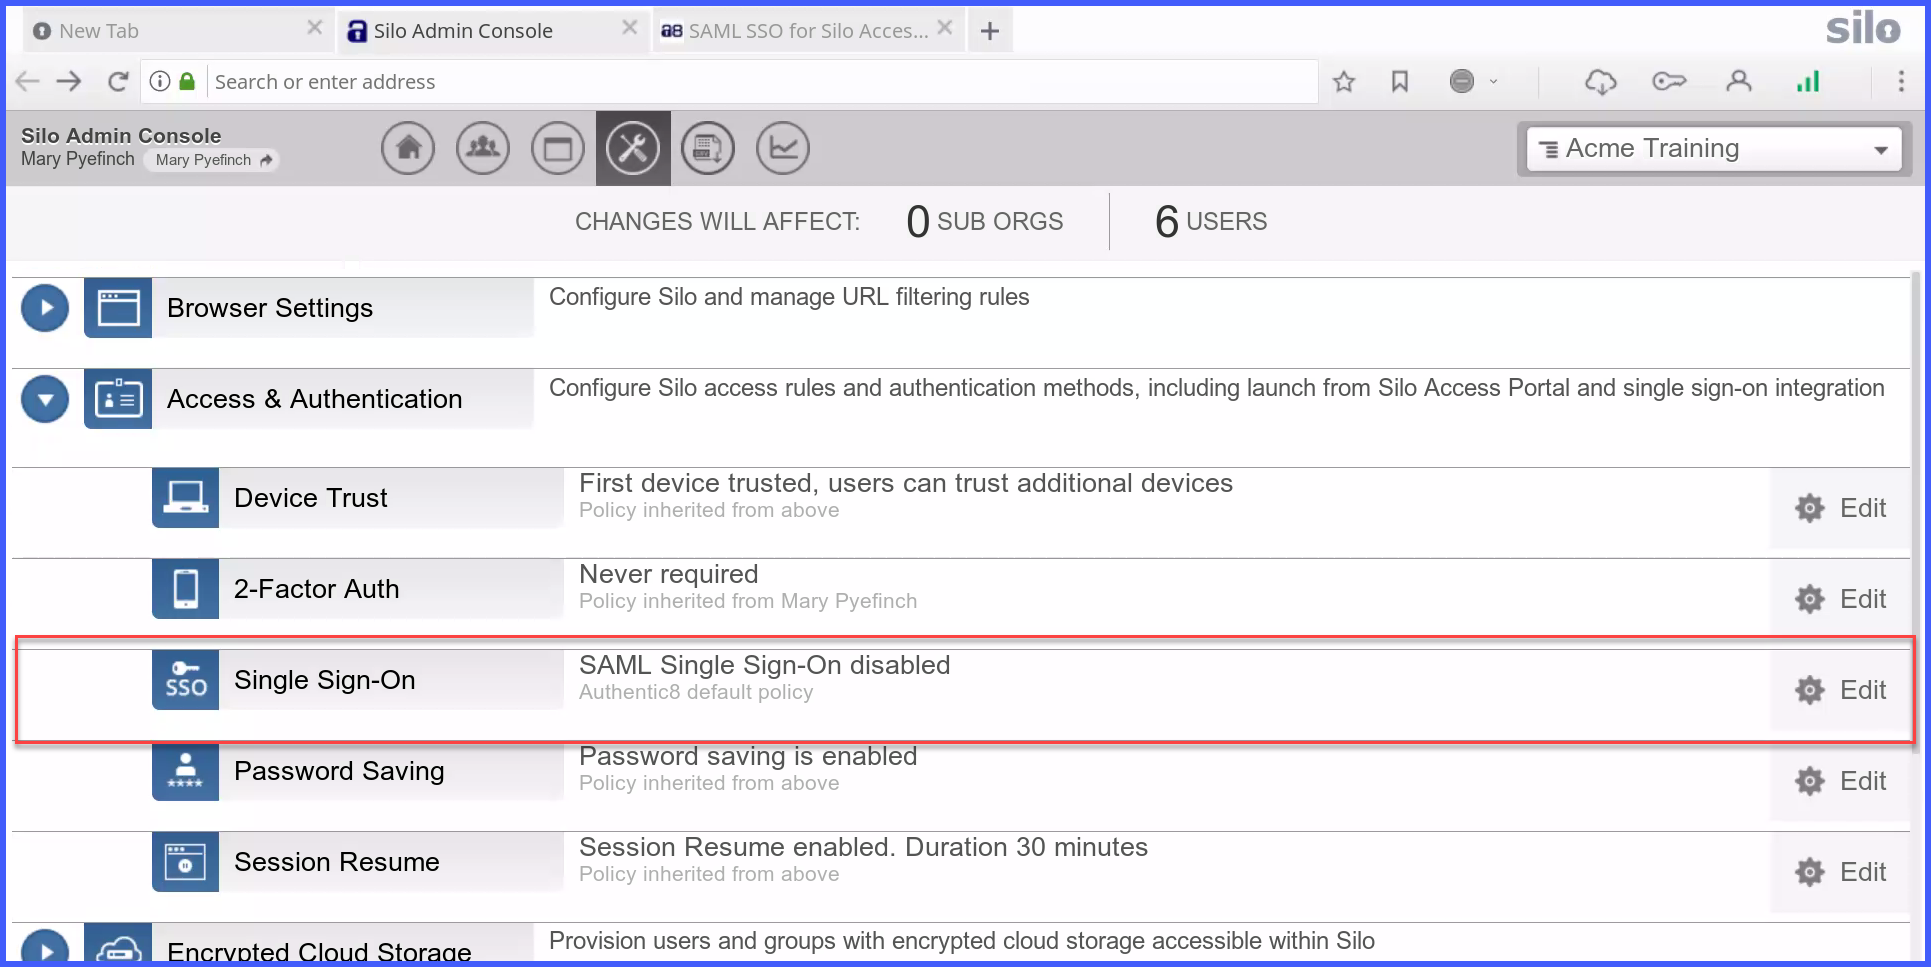
B. Enable SAML SSO and click Save

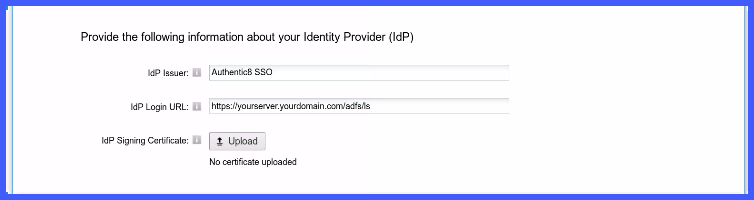
IdP Configuration Steps
A. Copy and paste the displayed SP URLs to update your IdP.B. Download and install your X.509 .crt encryption certificate to your IdP.
NOTES: - Please see your IdP's documentation for specific instructions with entering the required SP URLs.
- Authentic8 may have additional configuration support for other IdPs, which can be requested by contacting Support.
ldP Cheat Sheets
- ADFS 4.0 with Authentic8 Silo Access Portal Cheat Sheet
- Okta with Authentic8 Silo Access Portal Cheat Sheet
- OneLogin with Authentic8 Portal Cheat Sheet

Silo (SP) Configuration Steps
A. From your IdP, obtain the required URLs
B. Update Silo (SP) with the URLs
C. Upload your X.509 .crt IdP signing certificate from your IdP
D. Click Save
E. The final step in configuring SAML is modifying the Installed Client with the proper registry settings
Windows Registry
Here are the required Windows Registry entries.
Please note that the FEATURE_BROWSER_EMULATION value is 2710 Hexadecimal not Decimal. The decimal value 10000.

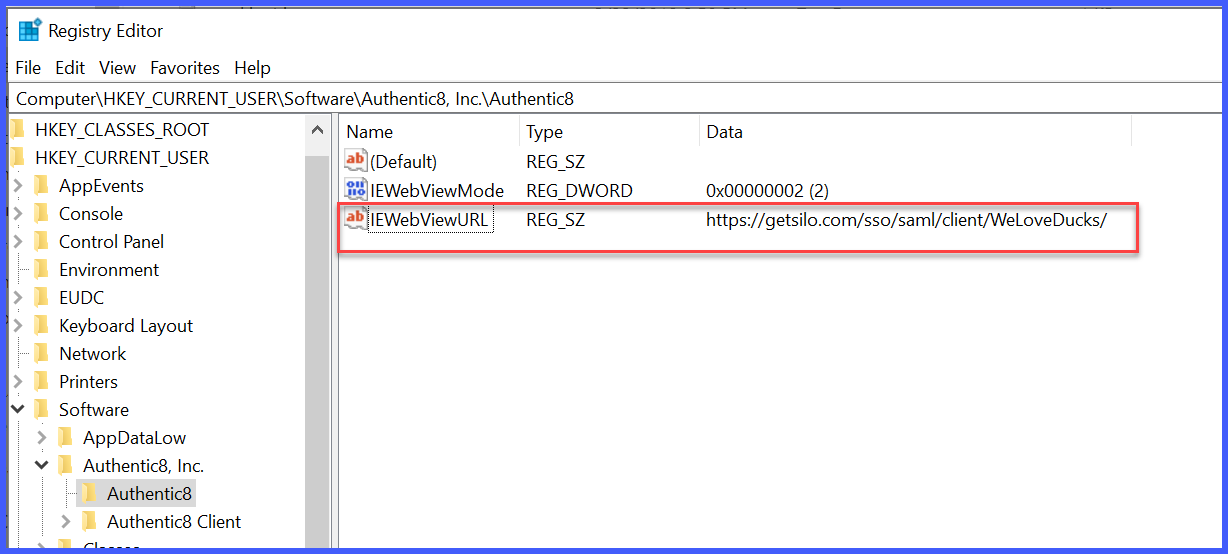
- "IEWebViewURL"="https://getsilo.com/sso/saml/client/<vanity_url_value>"
- The IEWebViewMode settings are defined below. The setting for SAML authentication is 2.
Note: Silo Access Portal (Vanity) URL is required to set IEWebViewURL.
IEWebViewMode Settings
When making the SAML registry changes the IEWebViewMode setting needs to be set to the appropriate value.
Value Authentication Method 0 Standard login (e.g., Pin or Differed Pin) 1 A combined standard login and SAML option for testing. 2 SAML
macOS plist Configuration
A. Open Terminal
B. If necessary, cd to /Users/<username>/Library/Preferences/ for com.authentic8.launcher.plist
C. Enter command as one continuous line:
defaults write com.authentic8.launcher WebViewUrl https://getsilo.com/sso/saml/client/<vanity_url_value>
D. Enter command: defaults write com.authentic8.launcher WebViewMode <1 or 2>
Examples:
Enter a value of [1] to display an optional [Use SSO] button
defaults write com.authentic8.launcher WebViewMode 1
Enter a value of [2] to enforce SSO authentication only
defaults write com.authentic8.launcher WebViewMode 2
E. To confirm the plist values, enter command:
defaults read com.authentic8.launcher | grep -i WebView
Optional: Integrated Windows Authentication (IWA) Settings
Configure your Internet Options to allow secure communication between our client and your internal SSO server.
Here are the steps:
Control Panel
- Internet Options
- Security
- Local intranet
- Sites
- Advanced
- Type https://yourserver.yourdomain.com then click Add
Additional Notes
Please contact Support if you have any additional questions and/or require further information.
Introduction
Designed for the enterprise, Silo’s implementation of SAML SSO allows for PIN-less access with federated authentication through your preferred Identity Provider (IdP).
All Silo authentication steps are seamless and transparent to the end-user when employing SAML SSO functionality.
Technical Details
Silo will work with any SAML 2.0 SSO implementation with a few exceptions.
SSO compatibility has been verified with the following IdPs:
- Azure Active Directory
- Duo
- F5 BIG-IP
- Microsoft AD FS
- Okta
- OneLogin
- PingIdentity
- SecureAuth
- GSuite
- Google SSO
System Requirements
A working, compatible SAML 2.0 IdP
- Silo Access Portal must be enabled.
- For Windows installs, the enabling of Integrated Windows Authentication (IWA) is optional.
- TLS 1.2 connection
NOTE: Effective March 30 2020, our products will only support TLS 1.2 connections, and will cease support for TLS 1.1. For the Installed Client, please ensure their version meets/exceeds the minimum required to support
Configuration
If you are already familiar with providing Single-Sign-On (SSO) access to other services, then the configuration should be straightforward.
We recommend reviewing your SAML IdP's documentation on Service Provider (SP) configuration prior to starting as a first step. This step should include locating your IdP's configuration URL values and X.509 (.crt) IdP Signing Certificate to help streamline the process.
Silo Portal Configuration
The Silo Portal configuration step consists of setting the Silo Access Portal (Vanity) URL; the Vanity URL must be set with in order for the SAML SSO configuration to work.
This will serve as a custom URL for SSO access to Silo
Steps
From the Silo Admin Console, navigate to Users and Orgs section:
A. Click the Manage button
B. Select your ORG and click the Edit Orgs button
C. Enter a value in the Vanity URL field
D. Click Save
Silo Single Sign-On Configuration
A. From the Silo Admin Console navigate to the Single Sign-On configuration page.
B. Enable SAML SSO and click Save
A. Copy and paste the displayed SP URLs to update your IdP.
NOTES:
- Please see your IdP's documentation for specific instructions with entering the required SP URLs.
- Authentic8 may have additional configuration support for other IdPs, which can be requested by contacting Support.
ldP Cheat Sheets
- ADFS 4.0 with Authentic8 Silo Access Portal Cheat Sheet
- Okta with Authentic8 Silo Access Portal Cheat Sheet
- OneLogin with Authentic8 Portal Cheat Sheet
Silo (SP) Configuration Steps
A. From your IdP, obtain the required URLs
B. Update Silo (SP) with the URLs
C. Upload your X.509 .crt IdP signing certificate from your IdP
D. Click Save
E. The final step in configuring SAML is modifying the Installed Client with the proper registry settings
Windows Registry
Here are the required Windows Registry entries.
Please note that the FEATURE_BROWSER_EMULATION value is 2710 Hexadecimal not Decimal. The decimal value 10000.
- "IEWebViewURL"="https://getsilo.com/sso/saml/client/<vanity_url_value>"
- The IEWebViewMode settings are defined below. The setting for SAML authentication is 2.
Note: Silo Access Portal (Vanity) URL is required to set IEWebViewURL.
IEWebViewMode Settings
When making the SAML registry changes the IEWebViewMode setting needs to be set to the appropriate value.
Value | Authentication Method |
| 0 | Standard login (e.g., Pin or Differed Pin) |
| 1 | A combined standard login and SAML option for testing. |
| 2 | SAML |
macOS plist Configuration
A. Open Terminal
B. If necessary, cd to /Users/<username>/Library/Preferences/ for com.authentic8.launcher.plist
C. Enter command as one continuous line:
defaults write com.authentic8.launcher WebViewUrl https://getsilo.com/sso/saml/client/<vanity_url_value>
D. Enter command: defaults write com.authentic8.launcher WebViewMode <1 or 2>
Examples:
Enter a value of [1] to display an optional [Use SSO] button
defaults write com.authentic8.launcher WebViewMode 1
Enter a value of [2] to enforce SSO authentication only
defaults write com.authentic8.launcher WebViewMode 2
E. To confirm the plist values, enter command:
defaults read com.authentic8.launcher | grep -i WebView
Optional: Integrated Windows Authentication (IWA) Settings
Configure your Internet Options to allow secure communication between our client and your internal SSO server.
Here are the steps:
Control Panel
- Internet Options
- Security
- Local intranet
- Sites
- Advanced
- Type https://yourserver.yourdomain.com then click Add
Additional Notes
Please contact Support if you have any additional questions and/or require further information.